Project Pythia Cookbooks are collections of more advanced and domain-specific example workflows building on top of Pythia Foundations. They are geoscience-focused and should direct the reader towards the Foundations material for any required background knowledge.
The following is a step-by-step guide to creating a new Cookbook and getting it hosted on the Project Pythia Cookbook Gallery.
Before you begin, ask yourself if the content you are developing for a cookbook would be better suited as an addition to an existing cookbook. The best place to discuss cookbook ideas is the Project Pythia category of the Pangeo Discourse.
If you’re not looking to create a new Cookbook, but rather looking for guidance on contributing to existing Cookbooks, first make sure you’re comfortable with the GitHub forking workflow, then take a look at the section below on “Pull Requests and previews”.
Data access
Before developing your cookbook, you should consider how it will access the data you plan to use. In loose order of preference, we recommend the following:
- Rely on data that is already freely available and accessible with tools in the ecosystem. Point to Foundations or other cookbooks for tool how-to guides if needed. Examples include the CMIP6 Cookbook and the CESM LENS on AWS Cookbook
- Focus on representative subsets of data that can be packaged alongside the cookbook in-repo. An example is the Landsat ML Cookbook
- Discuss your larger data storage needs with the Pythia team. We are currently experimenting with cloud object storage for Cookbooks via NSF JetStream2.
- Provide the tools and/or clear documentation for accessing the data that you have stored somewhere else
Use the template
- If you don’t already have a GitHub account, create one by following the Getting Started with GitHub guide
- On the Cookbook Template repository, click “Use this template → Create a new repository”
- Choose “Include all branches”.
- Give your repository a descriptive name followed by
-cookbook(e.g.,hydrology-cookbook,hpc-cookbook,cesm-cookbook) and a description - Create the repository. Your browser will be directed to the newly created repository under your GitHub account
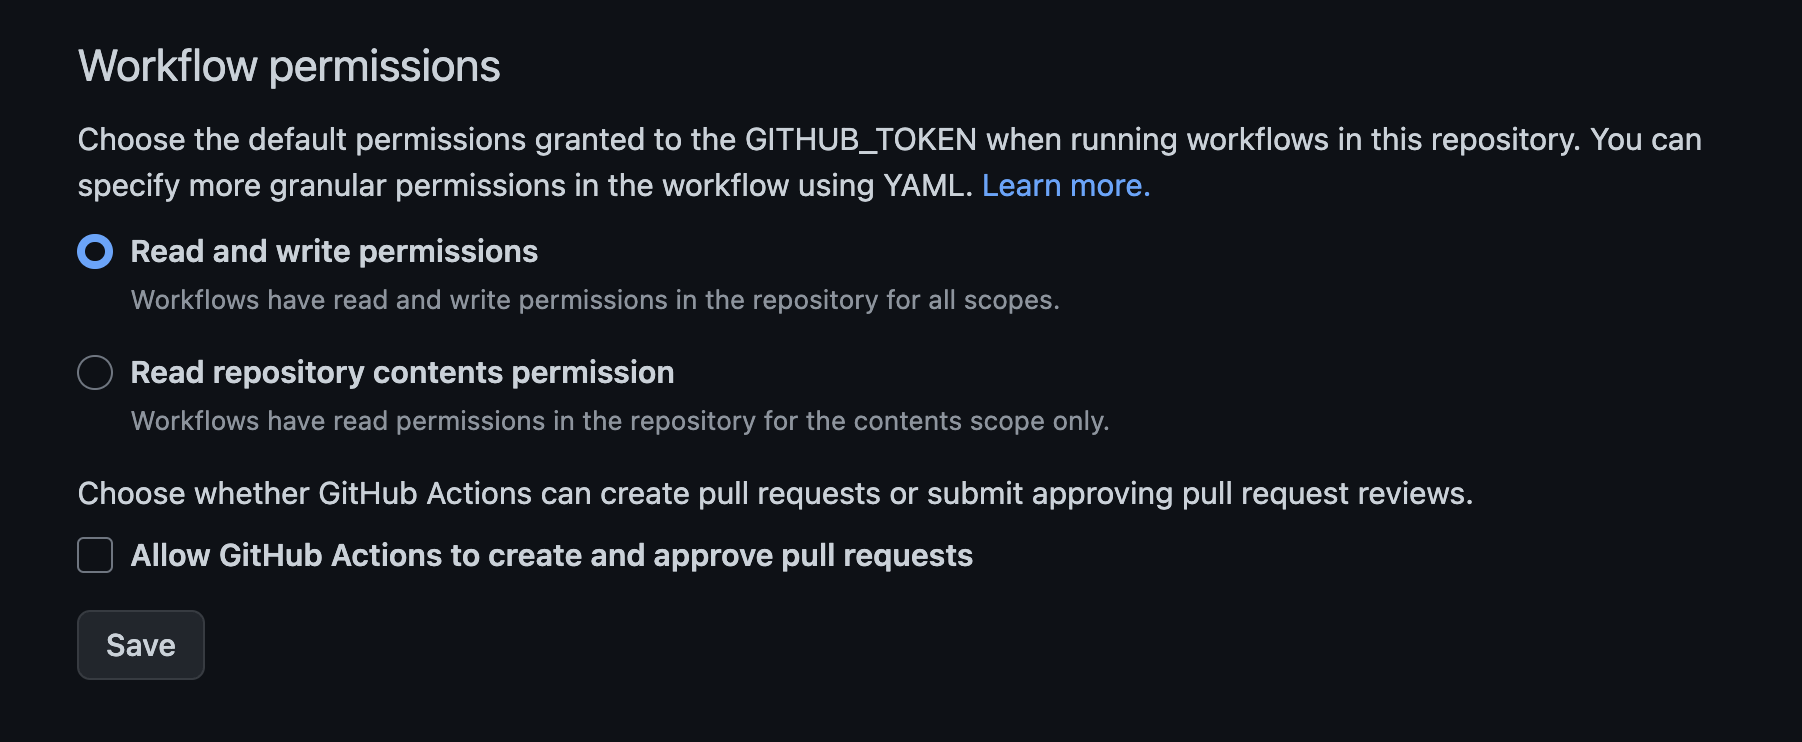
- Under Settings → Pages, ensure that GitHub Pages is enabled by checking that
Branchis set to “gh-pages”, and the folder set to “gh-pages/(root)”. If it is not, change the Branch from “None” to “gh-pages/(root)” and click “Save” - Under Settings → Actions → General, make sure that “Read and write permissions” is selected.
Your cookbook is now ready to have content added!
Transfer your cookbook repo to the ProjectPythia organization
In order for your Cookbook to be included in the Gallery, the source repository needs to be housed within the Project Pythia GitHub organization.
You can keep your repository in your personal GitHub space while you’re developing your content if that works better for you. Repository ownership can be transfered at any time.
However, we recommend transfering to the Pythia organization early, for a few reasons:
- Fewer settings to tweak later
- Easier to get help from the Pythia infrastructure team
- Encourages collaboration
Steps to transfer the repository
- Contact the Pythia team via the Pangeo Discourse (or otherwise) to let us know about your cookbook.
- You will get an invitation to join the the ProjectPythia organization.
- Accept the GitHub invitation. Welcome to the team!
- Once you are a member of the organization, navigate to the Settings of your cookbook repository and scroll down to the Danger Zone.
- Click “Transfer”.
- Select or type “ProjectPythia”, confirm, and transfer.
- When prompted about which teams to give access to, select “core”. This will enable the Pythia maintenance team to have full access to your repository.
Once you have successfully transfered the repository, you’ll most likely want to make a personal fork and a local clone of the repository so that you can continue to develop and collaborate on the Cookbook via the forking workflow.
Customize the paths in your repository
Whether the repository lives in your personal GitHub space or on the ProjectPythia organization, there are several paths and links in the repository code that need to be updated to reflect the current home of your cookbook source. This step is necessary to ensure that the cookbook building and publishing infrastructure works as intended.
Fortunately this is quick and easy. Just run our custom GitHub action called trigger-replace-links: Navigate to “Actions” → “trigger-replace-links” → “Run workflow”.
Set up the computational environment
You’ll most likely want to do your edits in a local clone of the repository on your laptop or wherever your are running your notebooks.
Customizing your environment file
- Within
environment.yml(in the root of the repository), changenamefromcookbook-devto<your-cookbook-name>-dev(e.g.cesm-cookbook-dev) and add all required libraries and other dependencies underdependencies:. Commit the changes. - Create the conda environment with
conda env create -f environment.yml. If it crashes, try runningconda config --set channel_priority strict - Activate your environment with
conda activate <env-name>
You’re now ready to create and run awesome notebooks.
Customizing your GitHub actions
Your repository includes automation for building and publishing your Cookbook, powered by GitHub Actions. Now that you have created a custom name for your conda environment (<your-cookbook-name>-dev), you need to edit three files found in the .github/workflows section of your repo:
.github/workflows/nightly-build.yaml.github/workflows/publish-book.yaml.github/workflows/trigger-book-build.yaml
In each of these files, in the field called environment_name:, replace cookbook-dev with the name you used in your environment.yml file (probably <your-cookbook-name>-dev). Commit these changes.
Develop your cookbook
Add notebooks
To add content, you should edit (and duplicate as necessary) the notebook template notebooks/notebook-template.ipynb. Using this template will help keep your content consistent with the expected Cookbook style.
You can add subfolders to organize your notebook files as necessary. However, the organization of the notebooks within the published book is dictated by the table of contents file _toc.yml. Edit this file to add your chapters. Take a look at the radar-cookbook/_toc.yml for example syntax, or consult the JupyterBook documentation.
Customize your home page
The file README.md serves as the homepage of your Cookbook, so it should be descriptive. Edit this file as appropriate, following guidance in the file itself.
Build your Cookbook locally
You should be able to build your new Cookbook on your local machine by running this command from the root of the repository:
jupyter-book build .from the root of your repository. This will execute all your notebooks and package them into a book styled with the Pythia theme.
If the build is successful, you should be able to preview the result in a web browser by running
open _build/html/index.htmlStrip output from your notebooks before committing
Wherever feasible, we recommend only committing bare, unexecuted notebooks into your Cookbook repository. There are a few reasons:
- The notebooks are executed automatically each time the book is built
- Pre-existing output in the notebooks will have no effect on the published book
- Better reproducibility of your content
- The repo stays cleaner and leaner. Diffs of notebook changes are easier to interpret.
To strip a notebook, in a Jupyter Lab session, go to “Kernel” → “Restart Kernel and Clear Output of All Cells...”. Save your notebook, then commit.
You’re ready to push content up to GitHub and trigger the automated publishing pipeline.
Deploying your Cookbook
Pythia Cookbooks are not just collections of notebooks! They are backed by GitHub-based automation that handles building, testing, previewing, and publishing the books online.
About the publishing pipeline
Any time you push new content to the main branch of your Cookbook repo, actions are triggered that do the following:
- Create an up-to-date build environment using your
environment.ymlfile - Execute all the notebooks in that environment
- Package the book into a styled website
- Check all the links in the website to make sure they are valid
- Deploy the styled website so it’s visible to the world
Where is my book?
The URL of your published book will depend on where the source repository is housed.
- If the repo is in the Project Pythia organization, the book is published to
https://projectpythia.org/[YOUR_COOKBOOK_REPO_NAME]/ - If the repo is in your personal GitHub space, the book is published to
https://[YOUR_GITHUB_USERNAME].github.io/[YOUR_COOKBOOK_REPO_NAME]/
Here’s a handy trick for finding your published book:
- On the home page of your GitHub repo, look for the “About” section in the right-hand side bar.
- Click the “gear” icon next to “About”
- Select the checkbox “Use your GitHub Pages website”.
- Is that checkbox missing? That likely means you’re looking at the “About” section of your personal fork, not the upstream fork. Navigate back to
https://github.com/ProjectPythia/[YOUR_COOKBOOK_REPO_NAME]/and look for it there.
The link to your published book will then be displayed on the home page of the repo.
Pull Requests and previews
Collaboration on Cookbooks is best done via Pull Requests. Every PR on a Cookbook repository will trigger a “Preview” version of our publishing pipeline. The entire book is re-built from the updated source and the preview site is hosted at a temporary online location. This way, the team can safely see what the end product will look like after the PR is merged.
The only difference between the “preview” pipeline and the regular publishing pipeline is the URL to which the rendered website is deployed. A temporary preview location is used, leaving the main book untouched until the PR is merged.
To propose changes to a Cookbook, or even just to test something out temporarily, follow the forking workflow: make changes on a feature branch of your personal fork, and open a Pull Request from that branch to the main branch of the upstream fork. This will trigger the preview.
A link to the preview will appear as a comment on the Pull Request once the publishing actions are complete. If the link shows up but you get a 404 error when you click on it the first time, just wait a few minutes! There are some lags before the preview is fully deployed.
Not satisfied? Keep making changes! Every new push to the feature branch on your personal fork will trigger another rebuild, and an updated preview. The preview will be deleted if and when the PR is closed or merged.
Building on the Pythia Binder
For Cookbooks with substantial compute requirements, you have the option of routing notebook execution to a specialized Binder service maintained by the Project Pythia team.
Here’s how:
- Edit your
_config.ymlin the root of your repo. - Change the field
execute_notebooksfromcachetobinder. - Commit that change and open a Pull Request to your main branch.
- That will trigger a build and preview as usual, but the notebook execution will happen on the Binder.
- If all is well, merge the changes, and all further builds will work this way.
Publish your Cookbook on the Pythia Gallery
Once you’re happy with your content and your Cookbook is building and deploying properly, it’s time to think about submiting it for inclusion in the Cookbook Gallery!
At this stage, there are a few more steps to get things ready to go.
Authorship and the CITATION.cff file
Cookbooks are scholarly objects. As part of the publication process, your Cookbook will get a citeable DOI (via Zenodo). Just as for journal publications, you need to make decisions about who gets credited for authorship.
This information is managed manually through the file CITATION.cff in the root of your repository. This will determine the names displayed on your card in the gallery as well as your DOI-based citation.
Edit CITATION.cff as follows:
- If you haven’t already, remove the people already listed in this file. These are the credited authors of the Cookbook Template only, and they should not be included in your author list (unless one of them also happens to be a content author for your book).
- Set your Cookbook title
- Write a short description / abstract (this will also appear on the gallery)
- Include names of all content authors
- ORCID and other metadata for each author is optional but helpful
- Under the
name:field, change “Cookbook Template contributors” to “[Your Cookbook Name] contributors”
Gallery tags
The file _gallery_info.yml determines how your Cookbook will be findable on the gallery. Edit this file with the following:
- Replace
thumbnail.pngwith your own image (which will appear on your gallery card) - Edit the tags under
domainsandpackagesas appropriate. Check out the existing filters on the gallery page to get a sense of how these are used.
Generate a DOI
Once all the above steps are complete and your CITATION.cff file is correct, you are ready to “release” a tagged version of your book and generate your first DOI. We’ve tried to make this as painless as possible, but there are a few more steps to take initially.
As always, reach out to a Pythia team member for help with any of these steps!
- Go to zenodo.org and log in. If you have never used Zenodo, you will need to create an account. We recommend authenticating through GitHub.
- Once logged in to Zenodo, under “My account”, click on “GitHub”.
- You will see a long list of GitHub repositories, both your personal repos as well as the ProjectPythia repos.
- Find your Cookbook repository (which needs to be housed in the ProjectPythia organization at this point), and toggle the “On” switch.
- Now, leave Zenodo and go back to GitHub
- Make a new release of your Cookbook repository! This is on the right nav side of the page from your code-view in the repository.
- The DOI will now be generated automatically. The DOI badge on your homepage should link to the new archive that was just created on Zenodo.
Initiate the Cookbook review process
If you haven’t already, now is a great time to contact the Project Pythia team to let them know about your new Cookbook. You will be assigned a Cookbook advocate from the Pythia maintenance team. They will open an issue on your Cookbook repository with the Cookbook Checklist for you to document your completion of the above process, plus a few more GitHub-specific steps. Once you complete this process, your Cookbook will be ready for review and publication!
Submit your Cookbook to the Gallery
Click the button below to request addition of your Cookbook to the Project Pythia Cookbook Gallery.
Submit a new Cookbook- Click the above button, or use this link to the new cookbook PR template.
- Add the root name of your cookbook repository (e.g., just “cesm-cookbook”, not the whole URL) and any other information you’d like the team to know.
- The Pythia team will take a look at your content, and work with you on any necessary updates and fixes.
THANK YOU FOR YOUR AMAZING CONTRIBUTION TO THIS COMMUNITY RESOURCE!